Intro to Teensy
- May 21, 2021
- 5 min read
Updated: May 27, 2021
Some of this is covered in the "Quick Start" guide, but I'll go into more detail below...
With this project I hope to bridge the gap between the incredible work done by Paul Stoffregen & co with the Teensy to open up professional quality digital audio effect design to the masses, and the level of coding knowledge possessed by the average DIY pedal-meddler (often none). I'm somewhere in this gap myself, but this post (and this one) should demystify the process and hopefully by the end you'll be unleashing your wildest effects chain ideas as vibrations into the aether. (You'll learn some coding basics too!)
To begin, download the Arduino software, this is the program in which you'll write (or copy/paste) your code for each effect.
Then download Teensyduino.. This download contains the "libraries" where all the actual code is stored. You don't even need to look at it, the code you write will refer to the relevant sections of code in the libraries when needed, making it run.
Configure the Arduino software for use with the Episodes pedal by clicking Tools -> Board -> Teensyduino -> Teensy 4.0.
You'll also want to familiarize yourself with the Audio System Design Tool, which from now one I'll call the "GUI". No downloads are needed to run this, it's all online.
"Arduino" is the name of the IDE (the program/interface you write your code in) as well as the name of the programming language you'll use. The language is basically C++ (aka CPP) with a few alterations that make it easier to comprehend. Each program you write in the Arduino IDE is called a "sketch".
C++ is known as an "object orientated" language. An object is like a master file that contains all of the "functions" relevant to that file. A function is a snippet of code that does a particular thing, a thing that will probably be repeated many times while your program runs. "Calling" the function makes it run.
Each effect in the Teensy Audio GUI is an object, and each function is a way to control a parameter of that effect. Each labelled rectangle in the GUI represents an object. you can have multiple objects of the same effect.
Take this example of calling a function that belongs to an object:
bitcrusher1.bits(bitrate); "bitcrusher1" is the name of the object
bits is the name of the function
bitrate is a "variable" that gets "passed" to the function.
The names of each effect's functions will appear on the right if you click on the effect in the GUI. The names of each object appear on the blocks in the GUI as well as in the top right.
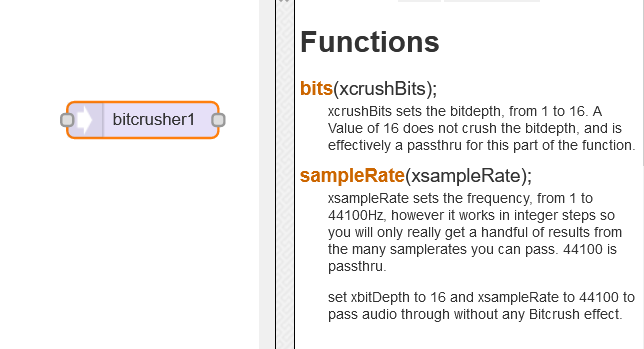
How objects and functions appear in the GUI
All objects and functions like this are stored in the Teensyduino library you downloaded earlier, in case you're wondering how so much magic comes out of so little code! What you see in the IDE is just the tip of a big code iceberg, but it's the only part you need to worry about.
A variable is pretty much always a number. It can be a letter but that's unlikely when making effects. If you just write "8" within the brackets above (where it says "bitrate") the effect will always crush down to 8 bit audio.
However, we want to be able to change the bitrate with a potentiometer, so the variable is a stand in for any number, for a number that we will keep changing elsewhere in the code.
Well, not quite any number, the maximum number that each variable can store depends on the variable's "type". Each variable is given a type when we "define" it, that is, when we first bring it into being early on in the code.
Defining a variable looks like this:
int Name_of_Variable; "int" is the data type, in this case an integer (not a fraction).
For simplicity and for newcomers, I suggest using only two data types: int and float.
float is for fractions (-3. ... ) A lot of audio objects, such as mixers, deal with numbers between 0 and 1 (eg 0.789) where 1 is full volume.
There are a whole bunch of other data types available, the purpose is to save internal memory. So if you have a variable that just remembers if something is on or off, you don't need to allocate a potential 64,000 numbers, like int does. But the Teensy has a lot of memory to work with, so it's unlikely that you'll hit the ceiling soon.
If you start to run out of memory in your sketch, or as you progress with coding, try including other data types. It's a good habit to get into, but for now we'll keep the barrier for entry low.
Types appear light blue when written in the IDE.
Quick warning about naming variables... certain words are already reserved for different tasks so naming your variable things like "LEFT" or "auto" will confuse the IDE! You'll see if you use those two examples they'll appear light blue (some words will go orange etc) meaning they already have a purpose. Your variable name should appear in black text.
"Comments" are annotations that explain what each part of the code is doing. They are to help other people understand your code, or to help you remember it later! They are written:
// after two forwards slashes, or...
/* between forward slashes and asterixes */
They appear grey in the Arduino IDE. To try your program without a certain line of code, you can comment it out (put 2 slashes before it) so it's easy to re-introduce ("uncomment") later.
You'll see this object and function ("Serial.print") appear quite a lot in the IDE examples:
Serial.print("Bitcrusher set to ");
Serial.print(bits);
This is a way of sending information back to your computer along the USB cable and having it appear on the screen. This can be useful for debugging. Include this line in setup() to enable the serial connection:
Serial.begin(9600); Write a variable name in the brackets after "Serial.print" and the value held by the variable will appear in the monitor. Write something in quotemarks and that exact text will appear.
Open the monitor in the IDE by going to Tools -> Serial Monitor. Sometimes the IDE expects you to use a specific USB port on your computer to receive serial info (you'll get an orange warning message if you're using the wrong one!) so you might have switch USB ports.
The two main functions used in every Arduino sketch are "setup()" and "loop()". Setup allows you to execute code just once when your program first fires up. Loop allows code to be repeated many times (useful for reading pots/switches and changing parameters). Include your code in the curly brackets underneath "setup()" or "loop()".
You don't have to worry about reading audio inputs, writing audio outputs or passing individual samples along your effects chain. This is all taken care of in the GUI generated code.
Now you can begin creating your own effects! [LINK}


Comments